Saturday, July 9, 2011

Fun at the Asian Market


Recently, I've been trying to incorporate more veggies into my diet (it's healthier!). Part of that has been trying to cook more Asian food, as I find it easier to sneak more veggies in a lot of Asian dishes. The summer class I'm teaching begins on Monday and I am currently engaged in meal planning as part of 'Operation: Avoid Sandwiches for Lunch'. I don't have easy microwave access on campus, so I've decided to try making a lot of cold noodle dishes as a way of bringing veggie-heavy lunches that don't require reheating.

So, today I went to the Asian grocery to stock up on some things I was missing or getting low on.
I think that the Asian grocery can be overwhelming for some people, if they don't have much experience cooking Asian foods. Through various means (including Chinese roommates and a trip to China and Japan), I'm lucky enough to have a fairly high degree of passive knowledge of useful things to get at an Asian market (although that doesn't mean I don't sometimes need to make an emergency phone call to a friend for help while at the store).

I have a few standard Asian dishes that I make a lot -- a Teriyaki dish with edamame that I love and Shrimp Lo Mein. (I tend to add more vegetables to the recipes than the originals include.) Recently, I've had some vague plans to try out a recipe for Sichuan Eggplant, a dish I have enjoyed many times but never tried to make at home. So, between the Sichuan Eggplant and my new obsession with cold noodles, a trip up to the big Asian market here in Austin (MT Supermarket) was in order.

Can I just say: I love the Asian grocery? The one I went to in college (in State College, PA) was extremely tiny, with narrow, narrow lanes stuffed to overflowing with products I did not recognize. MT Supermarket is *massive*. Not as big as the Asian groceries that you'll find in San Francisco, but easily as big as my local 'regular' grocery store.

I think that the easiest way to approach the Asian grocery is to make a short list of things you definitely need but then to let yourself explore a bit and get a couple of random things to try. If you've not really tried many Asian dishes, I'm going to try to post more Asian recipes in the next few weeks, so it'll give you something to try out!

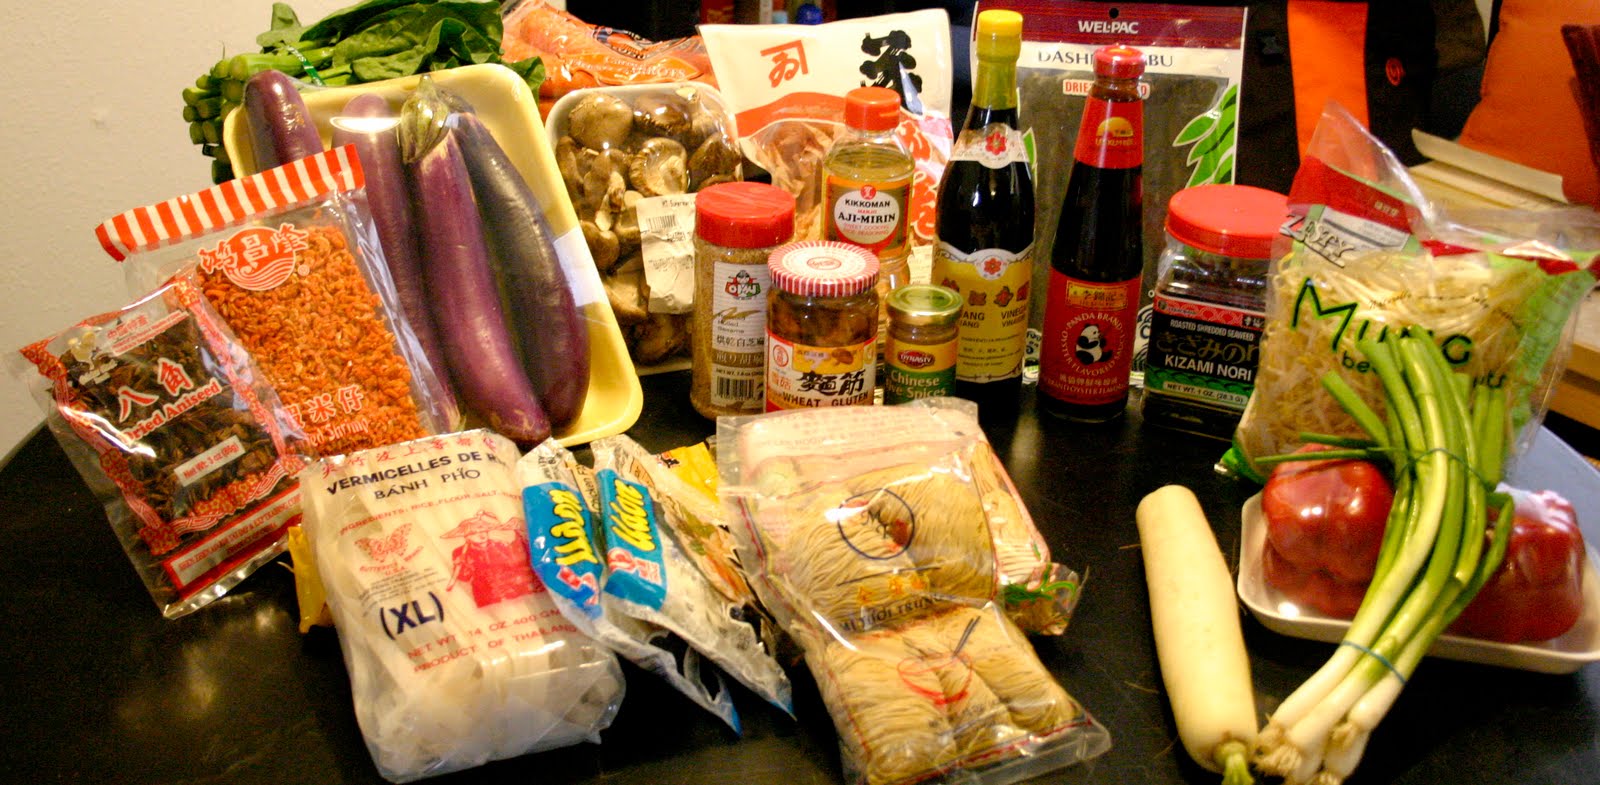
I always get overwhelmed in the big Asian groceries -- there are just so many yummy things and I experience a bit of sensory overload. I try not to get too much stuff while I'm there because I tend to get overexcited and wind up with more stuff than I could ever use. This was today's haul:


The produce there tends to be a lot cheaper than the produce at my local grocery, so I picked up some Chinese broccoli ($1.69/lb), red peppers ($1.99/lb), carrots ($1.69/lb), a Daikon radish ($.79/lb), bean sprouts ($.75/lb), scallions, and shitake mushrooms. They don't sell the long, thin Chinese eggplant at my local grocery (that's what I went for initially -- to make the Sichuan Eggplant). Spices are also cheaper, so I got a big bag of star anise (only $.99 for a fair amount of anise).

Other than that, there's a myriad of noodles! I always get fresh Chinese egg noodles while I'm there, plus I stocked up on Udon noodles and wheat noodles for making various cold noodle dishes. The big Pho noodles are excellent for all kinds of stirfries when you don't feel like using rice (make sure there's enough sauce though). I'm still learning about different kinds of noodles, so I like to buy a lot of different kinds and try things.

One of the things I'm planning on making in the next couple of weeks involves Dashi which is a kind of Japanese soup stock made of kombu (kelp) and katsuobushi (shavings of preserved, fermented tuna). You can buy pre-made Dashi , but I could not for the life of me find it, even in our massive store, so I'll have to make my own (which I'm weirdly excited about).

I also got some fun things to put on cold noodles -- like little strips of seaweed, roasted sesame seeds, and wheat gluten -- and several ingredients that I was missing or low on -- like Chinese black vinegar, Mirin (a sweet Japanese cooking wine), and Oyster sauce.

Finally, on the recommendation of a friend, I got tiny, tiny shrimps to use in cooking -- she told me to add them to the oil when I'm sauteeing garlic or ginger to deepen the flavor of the dish. I'm excited about that!

If you haven't been to your local Asian market, go ahead and check it out. A lot of the produce and spices are much cheaper than you'd find them at a 'regular' supermarket. And it's really easy to make fresh Asian food at home -- you can save money by avoiding Chinese takeout and incorporate more fresh veggies into your lunches and dinners.

Wednesday, July 6, 2011

Rainbow Cookies


These are my absolute favorite cookies in all the land. They have a couple of names: rainbow cookies or neapolitans, usually. I've always seen them at Italian bakeries, but I've also been told that they turn up in the Jewish bakeries of New York City.

They're amazing and, possibly because they're kind of time intensive to make, they're hard to find. Most Italian bakeries carry them, but it took awhile before I was able to find them in Austin, Texas (where I live). They're also generally pretty expensive. My mother always buys a couple of pounds of them for Christmas, but they're mainly a holiday treat. At my local Austin Italian bakery and restaurant, Mandola's, they're $1 per cookie. That's a little expensive for a grad student budget, so I wanted to learn how to make my own.

Because these cookies have several names (and "neapolitan" is a name used for other pastries originating in Naples), it was hard for me to find a good recipe for them. All of my googling turned up nothing. I even emailed the nice people over at The Kitchn to beg for help.

Apparently, Kim's google-fu is stronger then my own. Inspired by her own newfound love of these cookies, she tracked down this recipe on Allrecipes for me.

I was nervous about the recipe. I'm more of a cook than a baker and these looked complicated. Plus, although none of the ingredients were extremely expensive, it all added up. So I didn't want to try and fail. But my love of the cookies pushed me to give it a try. They're usually red, white, and green (for Italy, I presume), but I decided that I would make them in a non-traditional red, white, and blue for a Fourth of July BBQ (though the blue looks more green anyhow).

Having made them once now, I will say that they're not really all that difficult, they just take a fair amount of time and pre-planning (because there are several steps where you need to chill the cookies for several hours). There are a couple of steps that are mildly difficult, but not if you know what to expect (which I hope I've explained!).

You can look at the recipe I followed, but I've made some changes to it and I'm going to post what I made rather than the recipe I worked from.

Rainbow Cookies

Ingredients:
Cookies:
7 oz almond paste
1 cup butter, softened
3/4 TBSP almond extract
1 cup white sugar
4 eggs
3 cups all-purpose flour
12-15 drops red food coloring
12-15 drops blue food coloring
1/2 cup raspberry jam

Chocolate coating:
1 bag semisweet chocolate chips
1/4 cup whipping cream
2 TBSP unsalted butter

Special tools:
THREE 9X13 pans
Parchment paper

Preheat oven to 350 degrees and line your three baking pans with parchment paper. I found it easiest to spray cooking spray in the pan to stick the parchment paper and make sure it came out cleanly. I tried just using cooking spray for one of the layers and it was much harder to spread the dough.

In a large bowl, break apart the almond post with a fork. This is easier said than done. One commenter on the Allrecipes post recommended grating the almond paste, which might make things easier. I spent a long time mashing it with a fork and then just lost patience.

Cream almond paste with butter, sugar, eggs, and almond extract. The Allrecipes version wanted you to separate the eggs and beat in the yolks first and then add in beaten egg whites, but I didn't bother with all that and it turned out fine. [Thank you to commenter sweets4u who tipped me off that separating the eggs was unnecessary.] I beat the egg, sugar, almond paste mixture for a long time with my hand-mixer to get rid of all the small chunks of almond paste. When it's fluffy and smooth, mix in the flour to form a dough. The dough will be pretty thick.

Divide dough into three equal portions. I used three glass pyrex bowls to do this (so I could eyeball the levels in the bowls) but I mainly just tried to slowly spoon equal amounts into each bowl until I was out of dough. A more precise chef probably would have measured, but that's not me.

Mix one portion with red food coloring and one with blue (traditional is red, green, and white -- for Italy! -- but I was going for USA!). The original recipe called for 6 drops of food coloring, but I definitely doubled that to get a richer color. One of the commenters suggested using gel food coloring, but I don't have experience with that.

Spread each portion into one of the prepared baking pans. This is one of the hardest steps and I wish I'd taken photos of it after I'd done it. The dough is very thick and it was very difficult to spread it evenly across the pans. It does level out a bit during cooking though (so it won't have all of those ugly swirls from the spatula in the top). In the end, you're going to press the cookies overnight, so a bit of messiness on the top doesn't really matter. Just try to the level as even as possible.

The recipe I followed said to bake for 10-12 minutes, but I needed to bake mine for about 20. It's done when the layers are lightly browned. I watched it pretty carefully and rotated the pans in the oven (I have a hot spot in my oven).

This step is the scariest: Carefully remove the layers from the pans. With the parchment paper, I just lifted the layers out and moved them directly to a cooling rack. With the one layer I made without parchment paper (the blue), I had a very nerve-wracking time of flipping it over onto a baking rack covered in parchment paper. The layers are very thin, so I kept the parchment under them until they'd cooled. I worried that they'd break and fall through the cooling rack from the pressure of their own weight otherwise.

[As you can see, I only own two cooling racks, so I had to cool one of my layers on a splatter guard. You make do.]

Let cool completely. I gave mine about 6 hours, though you probably don't need that long [I went out to dinner and a movie.]

Once cool, place a layer of plastic wrap large enough to wrap around all three layers on a cookie sheet (I used my ugly halloween tray -- I didn't know I'd be posting all this to a blog when I made them!). I had to kind of layer the plastic wrap. It's pretty forgiving and, once the cookies are cooled, they felt a lot less delicate than they did while still hot.

Place the blue layer (or green, if you're being traditional) on the plastic wrap and spread with 1/4 cup of your raspberry jam. I didn't measure mine -- I just spread until I had completely covered it in a thin layer of jam. Place the white layer on top, and spread another 1/4 cup of raspberry jam. Place the red layer on top (no jam this time though!). It's a little nerve-wracking to flip the layers in place, but the jam makes it a bit forgiving -- you can slide them into place so they're all stacked evenly.

Here's what you get:


[Please forgive the ugly tray. And also, my cell phone pictures made the red layer look like I dyed it with Kool-Aid -- it wasn't that bright in real life! Next time: no cell phone photos, I promise!]

Now, wrap them up, put another baking sheet on top, and put them in the fridge overnight with some heavy things on top of them to compress the cookies and press the layers together tightly.

In the morning, you'll need to melt your chocolate. I put a bag of semi-sweet chocolate chips in a 4 cup Pyrex measuring cup with 2 TBSP of butter and 1/4 cup of heavy whipping cream. I microwaved the whole thing in 30 second increments, stirring between each shot of heat. You can use the double boiler trick if you'd prefer, but I find the microwave easier. [If you've not done melted chocolate before, make sure that you keep water away from it -- your spoon/spatula for stirring needs to be totally dry -- water will make the chocolate seize up.]

While you're melting your chocolate, take your cookies out of the fridge and remove the plastic wrap. The whole thing feels much less delicate at this point -- I was no longer worried that the cookie was going to crumble in my hands!

I didn't do this, but I would recommend cutting off the untidy edges of the cookie at this point. The edges end up not tasting right because you don't have the right balance of cookie, jam, and chocolate. So cut them off before you coat it all in chocolate.

Once the chocolate is completely melted, just pour it on the cookie, using a spatula to spread it evenly. Make sure to get all the edges. You could probably get by with less than a bag of chocolate chips, but I found having a bit of extra chocolate made the whole process easier.

Now, chill in the fridge until the chocolate is firm (about 1-2 hours). Once firm, slice the cookies in small squares to serve. Some commenters on the recipe I followed suggested heating up the knife with hot water before slicing, but I found that unnecessary. I just used a towel to clean off cookie crumbs and ensure I had a clean knife for each layer and it came out fine.

Ta da! Amazing cookies to impress your friends!

Yet another cooking blog

There are so many cooking and recipe blogs on the internet already, I know. I read a ton of them. I could never imagine trying to compete with amazing food bloggers like Molly Wizenberg and Heidi Swanson, but I do like to cook and I want to write more about food.

I learned to cook late in life. I was probably about 30 before I could do more than make some basic pasta or cook a stirfry that wasn't a soggy overcooked mess of vegetables. I look back at that time and, honestly, I don't even know what I ate. Processed foods? A lot of turkey sandwiches? Probably some combination of both. I remember trying to follow recipes and just getting hopelessly stymied by the fact that I didn't know what asparagus looked like when it was done or how to tell how long to cook a piece of chicken. A lot of my early attempts to cook by following recipes just failed (I think a bit part of my problem was that I was always trying to cook things on too high of a temperature, which resulted in a lot of food that was burnt on the outside and raw on the inside -- yum!).

I've learned a lot over the last few years. Now I don't eat much processed foods and although I still love a turkey sandwich, I've attempted much more complicated recipes than just making pasta and heating up some sauce. And most of the time it even comes out! I like to make bread and I've even tried canning jams now a few times. I've gotten to the point where I'm no longer a slave to recipes (though I still follow recipes for the most part, it's just that my 'following' sometimes becomes more of an 'interpretation').

I have small selection of cookbooks [I used to think I had a lot, but then I started seeing food bloggers talk about having hundreds!] I love Mark Bittman, anything from Cooks Illustrated, and Alton Brown. They've all taught me a ton about cooking and I still consult them all the time.

Anyhow. This is all my longwinded way of saying that this is my new food blog. I've called it 'cooking around the internet' because it will mainly be a way to save and review recipes I've found online that I've made at home. I often make a lot of changes to them or find that the way they explain things isn't always as user-friendly for new or inexperienced cooks as it could be. I hope that, by writing about my cooking and food-love here, that I can help test recipes that I find online (and help point out good recipes and save people from the myriad of bad recipes online) and also perhaps convince some non-cookers to try their hand in the kitchen.